Thursday, June 21, 2012

Cinnamon Basil Sweet Tea

After I posted a few drink recipes a couple weeks ago, my friend who is expecting her first child in November asked if I would do some drink recipes that were alcohol free.  Of course I will!


This recipe uses cinnamon basil, but you could also make the simple syrup with lemon basil or mint.  Just keep everything else the same.


Cinnamon Basil Sweet Tea

Iced tea (made anyway you like)
2 tablespoons cinnamon basil syrup (recipe follows)
Ice

Place syrup in a tall glass and add ice and tea.  Stir to combine.

Cinnamon Basil Simple Syrup
1 1/2 cups white sugar
1 1/2 cups water
5-6 large sprigs cinnamon basil
1 vanilla bean

Combine sugar, water and vanilla in a large pot over medium heat.  Cook until all the sugar dissolves and the syrup isn't cloudy anymore.  Remove from heat and add basil sprigs.  Let basil steep in the syrup for at least 30 min.  Strain and store in the fridge.

NOTE about herb varieties.  I've found it is really easy to find a lot of these more unusual herbs. I don't shop at fancy nurseries, just a regular Home Depot and I've seen lots of cool varieties there.  So don't be scared to grow something a little different than the standard types of herbs.  I'm loving experimenting with my cinnamon basil and orange mint.

Wednesday, June 20, 2012

Farmer's Market Number 2

What a difference a couple weeks make!  Last Saturday I went to the farmer's market again and it was so different that the first time I went.  For one thing it was packed!  And all the stands were completely bursting with all different kinds of fresh fruits and veggies.


My strategy for navigating the farmer's market is I try to stay away from the huge stands because they are usually the most crowded and the people selling the produce are too busy to talk.  I like to search out the smaller stands.


It was one of the smaller stands where I found these gorgeous cherries.


They were so sweet and juicy and didn't last long before I ate them all.


I also found these...


They are garlic scapes.  Garlic scapes are the top part of the garlic plant and are usually cut off as the plant is growing.  But now they are becoming popular for cooking.  Its one of those ingredients that I've been seeing popping up lately in food magazines and cookbooks so I was excited to try cooking with them myself.  So I decided to make a quiche.


Garlic Scape Quiche


Pie crust (either homemade or store bought)
5 garlic scapes chopped
1 tablespoon chopped chives
3 eggs
1 1/4 cups heavy cream
1/2 tsp salt
1/2 tsp pepper
1/2 tsp paprika
1 cup shredded cheese (I used a 5 cheese Italian blend)


Preheat oven to 350 degrees.  


Saute chopped scapes in a little olive oil until they start to soften up a little.  Set aside to cool slightly.


Place pie crust in pie pan and prick bottom and sides with a fork.  This is called 'docking' and lets the steam escape so the crust doesn't puff up.  Bake crust for 15 min.


In the meantime, make the filling.  Mix eggs, cream, chives, salt, pepper and paprika together.  Spread cheese and scapes over prebaked crust and pour filling over the top.  Bake for another 30-40 minutes.  Since it is technically like a custard, I like to pull my quiche while the center is still slightly wobbly.  This insures I never end up with rubbery eggs.  Let the quiche rest for 15-20 min before serving.

Tuesday, June 19, 2012

Is it Rick Bayless Week?

Have you ever noticed that whenever you learn a new word all of a sudden it seems like that word is everywhere?  Or you hear a song for the first time and then it seems like every radio station in the world is playing it all the time?  Well, that happened to me last week.  Only it wasn't a word or a song...it was Rick Bayless.


For those of you who don't live in the Chicago-land area and might not have heard of him, Rick Bayless is a celebrity chef with several restaurants in Chicago.  He specializes in Mexican cooking and while I haven't eaten at any of his restaurants myself (yet) I've heard they are incredible.


My inadvertent Rick Bayless week started at Lit Fest.  There is a food stage where cookbook authors show off their stuff and he was presenting.  My friend and I were planning on going to another event at the same time so I didn't get to see him cook, but I did walk right next to him on the street.  Unlike when we saw Rachael Ray who was carefully guarded by security, he was just walking down the street by himself.  I could have reached out and touched him if I wanted to.  I didn't though of course.  That would be creepy.


Then on Wednesday night I was channel surfing and came across a really old episode of Iron Chef.  It was Rick Bayless vs. Bobby Flay.  Bobby Flay won unfortunately which was a bummer for me because I've always found him a bit smug.


All this lead up to the main event on Thursday...a garden tour of Rick Bayless' garden!  A lot of the salad greens and herbs for the restaurants are grown on this property which spans 3 lots in Chicago's Bucktown neighborhood.  This tour was already planned prior to the rest of all my sightings so its funny how things work out.  The tour itself was amazing and really interesting.  It was given by the man who designed and manages the garden so he was incredibly knowledgeable.  


Here are some highlights:


These raised beds grow about 500 lbs of greens in a season!  I was amazed at how neat and clean they look and how closely they plants were packed together.  They were definitely designed for maximum efficiency.  


They are constructed of metal to make the most of the space since the thin metal takes up less space than brick or wood.  And it makes it really easy to clip the bird netting to the frame.


One thing I was really interested in that I think I'm going to try myself is how they grow butternut squash.  They grow them vertically in cages (for support) so they don't sprawl out all over the garden and take over.  We have a spare tomato cage at my parents' garden that isn't being used for anything right now so I might try to convince them to let me grow a squash plant or two.


 Overall, I was surprised at how pretty the garden was.  I knew it was a working garden that was supplying the restaurants with food, so I wasn't expecting any space to be dedicated to landscaping and non-edible plants.  It was really lovely though and truly still looked like someone's home garden.  


According to the garden manager, this beehive is a new addition this year.  


Since most of the plants wouldn't survive the cold Chicago winters, there is also a greenhouse built on the second floor deck of the house.


 Here are a few more pictures I took of various things around the garden.


Seedlings, microgreens and compost pile in the back

Potting bench

The grill and outdoor kitchen.  Amazing!


Monday, June 18, 2012

Aphids of Doom

WARNING!  This post contains some gross bug pictures so if you are squeamish, scroll past them really quickly.


Last week was kind of a bad week for my garden.  Seemingly overnight my pepper and tomato plants became totally infested with aphids.


I tried a bunch of different things to get rid of them starting with a homemade garlic and dish soap spray I found online.  After that didn't work, I actually broke down and bought commercial pesticide even though I don't like to use it.  Nothing worked and my plants were getting totally destroyed.  


Finally, they were so damaged that I had to pull them out.  This was beyond frustrating because before the aphid attack they actually seemed like they were doing pretty well.


I rallied quickly though and bought some new plants to take their place.  This time I decided on more herbs.  One of the things I was trying to accomplish in my garden this summer was to experiment with what types of plants I could actually grow in the conditions I have (part shade, limited space).  Now that its already late June, I decided to focus my energy on growing plants that I knew would do well.  The herbs I already have growing are doing really well so I bought a few more varieties.  I added rosemary and two more types of basil.


Spicy Globe Basil and Cinnamon Basil
I've never tried either of these types of basil before.  I usually just grow the standard Genovese basil which is what you would use for pesto or caprese salad.  My boyfriend experimented with the spicy globe basil and made this pasta dish.


Sorry no exact recipe because it was kind of an experiment, but it has chipotle pasta that we got at the farmer's market, alfredo sauce, lots of garlic and red pepper flakes, parsley and spicy basil from my garden and shrimp.  Very spicy, but very delicious!

Tuesday, June 12, 2012

Deviled Eggs

This weekend I was really in the mood for deviled eggs so I decided to make a batch.  Of course a whole batch of deviled eggs is kind of a lot for one person, but I'm not complaining.  I've been bringing them for a snack at work and they are definitely better at keeping me from being hungry than my usual granola bar or 100 calorie pack.  


This is kind of an unusual recipe for deviled eggs because it contains no mayo.  I am not the biggest fan of mayo and it kind of grosses me out to see it in large quantities.  So I substitute cream cheese instead.  This recipe also gets a lot of flavor from a double dose of chives both in the cream cheese and fresh chives from the garden.


Chive Deviled Eggs


10 hard boiled eggs
2 1/2 tablespoons onion chive cream cheese
1 tablespoon honey mustard
2 teaspoons fresh chopped chives
salt and pepper to taste


Split eggs in half and remove yolks.  Mash yolks with remaining ingredients.  Spoon filling into egg whites.  Top with more chopped chives if desired.

Monday, June 11, 2012

An Accidental Rachael Ray Sighting

This past Saturday I attended the Printer's Row Lit Fest in Chicago with a friend.  Lit Fest is a really cool yearly event where tons of authors from all kinds of different genres give talks or demos (in the case of cookbook authors).  And its free!  So anyway, my friend and I were planning on seeing some Young Adult and Children's authors because that's her field.  In between events she suggested that we go into the library to use bathrooms that weren't port-a-potties.  This turned out to be a really smart idea because as we were headed downstairs to the bathrooms, a Lit Fest volunteer handed us tickets to the supposedly sold out Rachael Ray event.  It was less than 5 minutes before the talk was supposed to start and the only seats left were in the first and second rows so we got to sit nice and close to the action.  We were definitely in the right place at the right time!


As for the talk itself, it was pretty interesting.  Rachael was there to promote her new book The Book of Burger which is a really fun concept for a cookbook.  One thing I can take away from her talk is how she feels about food photography.  She thinks that food pictures should look a little bit messy and like you could dive right in and eat them.  Now that I've had a chance to page through her book, I totally agree.  Those burgers look delicious!  Its really great that she embraces the idea of home cooked food even down to the food actually looking like it was prepared at home.  I read a lot of cookbooks and I really admire how her food always looks like something I could do myself.


On a non-food note...she also looks amazing!  I can only hope to look as good as she does when I'm in my 40's.  If that is what cooking with so much EVOO will do for you, I'll start buying it by the gallon.


So in honor of my unexpected encounter with Rachael Ray and her burger book, I'm sharing my recipe for Jerk Chicken Burgers.  These use lettuce and flat leaf parsley from my garden.


Jerk Chicken Burgers


This recipe makes about 3 medium sized burgers.  


1 lb ground chicken
2 tablespoons jerk seasoning
1 tablespoon chopped fresh flat leaf parsley
Pepperjack cheese
Sliced pineapple rings
Sliced tomato
Any variety soft lettuce (I used butter crunch because that's what I was growing)
Sandwich sized Hawaiian buns


Mix chicken with jerk seasoning and chopped parsley and shape into patties.  Grill or fry patties until thoroughly cooked.  Meanwhile, throw the buns on the grill too to toast them lightly.  You can grill the pineapple rings too if you like.  Top burgers with a slice or two of cheese and lettuce, pineapple and tomato.

Monday, June 4, 2012

Farmer's Market

It's finally June and the farmer's market has opened.  I went to the market in my town last weekend and got so much cool stuff.  I haven't been to a farmer's market in several years and the last time I went I was underwhelmed.  It seemed like there were more craft stands than produce stands.  I like crafts as much as the next person, but they aren't what I'm going for.  So I tried out a different market this year and was much happier.


I was open to getting whatever they had there, but I was hoping to see lots of fresh strawberries.  I've been really wanting strawberries ever since mine got eaten by birds.  Fortunately, I was not disappointed.  Almost everyone had strawberries for sale.


These nice ladies let me take a taste so I knew I was getting really good stuff.  I could have gone crazy and bought way too many.  I controlled myself though and brought home three baskets like this.


Aren't they pretty?  Fresh picked berries like these go bad a lot faster than the berries you get from the grocery store so I knew I had to use them up right away.  Luckily for me, that wasn't a problem.

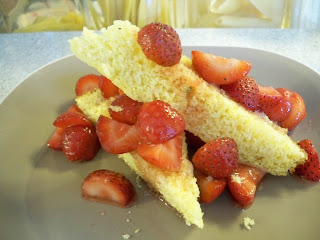
First, I made a strawberry shortcake using some of the leftover lemon thyme cornbread from the other night.  It might seem a little weird to use cornbread in strawberry shortcake, but it really works out great.  The cornbread is a little drier on the second day so it soaks up all the yummy juices from the sugared berries.  The lemon in the cornbread is a really nice compliment to the berries.  Plus, I got to practice my fancy plating skills and slice it into pretty wedges like this...


I still had berries left that I needed to use up so I decided to make jam.  Most jam recipes call for a ton of fruit and I only had about 3 cups so I decided to just make a really small batch.  I made a variation of the Strawberry and Lavender Jam from Canning For A New Generation by Liana Krissoff.

This stuff is so good!  Unlike a lot of jams it isn't too sweet so you can still taste the fruit.  The lavender adds just a little something in the background.

Strawberry and Lavender Jam


I only made a third of the real recipe so these measurements yield about 1/2 a pint of jam.

3 cups sliced strawberries
1/2 cup sugar
1 tablespoon lemon juice
1/2 tsp dried lavender or heaping tsp fresh

Mash the berries with a potato masher.  I like to leave it pretty chunky.  Add all ingredients to a medium saucepan.  Cook over medium heat until mixture is thickened stirring often.  Let cool slightly and ladle into a jar.  Store in the fridge.

Last, but not least, the farmer's market also had several fresh flower stands and places to buy plants and herbs to plant in your garden.  I resisted buying anything new for the garden, but I didn't come home empty handed.  My boyfriend bought me this lovely bouquet.


This type of flower is called Sweet William and in Victorian times it symbolized gallantry.  Sounds good to me!


Saturday, June 2, 2012

Lemon Thyme Cornbread

One of my favorite foods is cornbread.  A little weird for someone in Illinois probably, but I've always loved it.  My mom used to make the Jiffy cornbread mix from the little blue and white box when I was a kid.  Now I like to play around with different flavor combinations.  Here is one inspired by the abundance of thyme growing in my garden.

Lemon Thyme Cornbread

1 cup cornmeal
1 cup flour
3/4 powdered sugar
1 tsp salt
1/2 tsp baking powder
1/2 tsp baking soda
2 eggs
1 1/4 buttermilk
2 tbsp honey
1 1/2 tbsp fresh thyme leaves
zest of one lemon
7 tablespoons unsalted butter

Preheat the oven to 350 degrees

Combine cornmeal, flour, sugar, salt, baking powder and baking soda in a large bowl.  In a separate bowl combine eggs, buttermilk, honey, thyme and lemon zest.  Pour liquid ingredients into dry and mix just enough to combine.  Melt 6 tablespoons of the butter and add to the batter.

Pour into greased pan.  I like to use a springform pan because it looks pretty, but you could also use a square baking dish or cast iron skillet.

Bake 30-40 minutes until a toothpick inserted in the center comes out clean.  While cornbread is still hot brush the top with the remaining tablespoon of butter.